
Get Your HDTV in Shape
I must confess, for years I have been watching movies in a substandard fashion. Just unboxing my HDTV and changing the picture setting to “Movie” was as far as I ever got. If I planned to continue spending my time reading Blu-ray reviews to make sure I was getting the best quality transfers and audio tracks something needed to change. Enter the almighty internet to show me a mostly free solution to get my home theatre in shape. This was mostly brought to my attention while shopping for a 4K home theatre setup I never intended to purchase. While reading some TV reviews I noticed that everyone kept referring to getting their television professionally calibrated, which I had never heard of. So I took to Google and found this article. After running through those steps I realized just how bad things were. The most surprising being that I wasn’t even seeing the whole glorious HD image on my television. I had my aspect ratio set to Normal which seemed sensible to me. Nope. This actually had me losing about 5% of the image on the display due to overscan. It varies between manufacturer but setting my TV to “PC Mode” of all things fixed the issue.

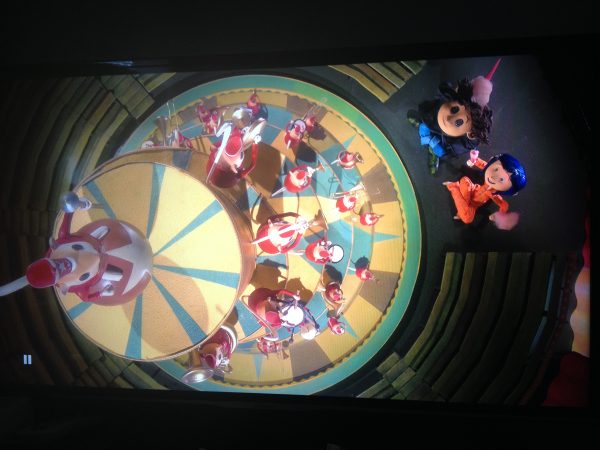
Setting the sharpness came as a bit of a revelation. All my life I was under the assumption that cranking the sharpness up led to a better picture. This I now understand, is completely wrong. With the sharpness set too high you can actually end up introducing artifacts into the image. Making the picture look closer to a GIF than an HD production. Sharpness level is still considered a matter of personal choice but I went from having it set from 50 down to 7. Lastly, I moved on to color temperatures. Not much to change here for my display except for the blue, which was set too high, causing it to look blown out in some cases. After finishing up my calibration I popped in a Blu-ray to check my work. I went with Coraline mostly because it ranks high on this list as a good reference disc. Stop-motion animation is basically just a series of very high-resolution images and Coraline packs a lot of detail and color in each frame so it makes sense to me that it would be a good benchmark.
The difference was noticeable. It’s hard to believe that my TV is just a cheap off-brand anymore. The fact that I was able to get these results for the cost of a blank DVD-R and 30 minutes of my time was well worth it. I think we owe it to ourselves to make sure we’re getting the most out of the money we spend on these discs. So if you’ve been leaving your picture settings alone I suggest you at least give this a try. Now all I have to do is sort out my audio situation, on the cheap.
Get Your HDTV in Shape
I must confess, for years I have been watching movies in a substandard fashion. Just unboxing my HDT

[HOME INVASION] NEW BLU-RAY RELEASES FOR MARCH 3RD, 2015
Here are your new releases for March 3rd, 2015:
[HOME INVASION] NEW BLU-RAY RELEASES FOR FEBRUARY 17th, 2015
Here are your new releases for February 17th, 2015: